Learn Cisco: RIP

Post Top Ad

Showing posts with label RIP. Show all posts

Lab 80 - RIPv2 Timers

March 28, 2011
Prerequisites: CCNP level skills.

Topology
Pic. 1 - Topology Diagram.
Icons designed by: Andrzej Szoblik - http://www.newo.pl

Task 1
Configure timers in RIP domain as follows:
  • Advertisements: 15 seconds
  • Invalid: 90 seconds
  • Holddown: 90 seconds
  • Flush: 120 seconds
Ensure that RIP convergence between R1 and R3 uses default timers.

Lab Solution

Task 1
Configure timers in RIP domain as follows:
  • Advertisements: 15 seconds
  • Invalid: 90 seconds
  • Holddown: 90 seconds
  • Flush: 120 seconds
Ensure that RIP convergence between R1 and R3 uses default timers.

On ALL Routers:
router rip
 timers basic 15 90 90 120
!

R1 Configuration:
!
interface serial0/1
 ip rip advertise 30
!

R3 Configuration:
!
interface serial0/1
 ip rip advertise 30
!
Read More

Lab 79 - RIPv2 Authentication

March 28, 2011
Prerequisites: CCNP level skills.

Topology
Pic. 1 - Topology Diagram.
Icons designed by: Andrzej Szoblik - http://www.newo.pl

Task 1
Configure RIP authentication between R1 and R3 using clear text method. Use key 1, and the password CISCO13.

Task 2
Configure RIP authentication between R2 and R3 using MD5 method. Use key 1, and the password CISCO23.

Lab Solution

Task 1
Configure RIP authentication between R1 and R3 using clear text method. Use key 1, and the password CISCO13.

R1 Configuration:
!
key chain RIP_CLEAR_TEXT
 key 1
   key-string CISCO13
!
interface Serial0/1
 ip address 10.1.13.1 255.255.255.0
 ip rip authentication key-chain RIP_CLEAR_TEXT
 serial restart-delay 0
!

R3 Configuration:
!
key chain RIP_CLEAR_TEXT
 key 1
   key-string CISCO13
!
interface Serial0/1
 ip address 10.1.13.3 255.255.255.0
 ip rip authentication key-chain RIP_CLEAR_TEXT
 serial restart-delay 0
!

Verification:
Pic. 2 - RIP Debug on R3.

Pic. 3 - RIP Details on R3.


Task 2
Configure RIP authentication between R2 and R3 using MD5 method. Use key 1, and the password CISCO23.

R2 Configuration:
!
key chain RIP_MD5
 key 1
   key-string CISCO23
!
interface Serial0/2
 ip address 10.1.23.2 255.255.255.0
 ip rip authentication mode md5
 ip rip authentication key-chain RIP_MD5
!

R3 Configuration:
!
key chain RIP_MD5
 key 1
   key-string CISCO23
!
interface Serial0/2
 ip address 10.1.23.3 255.255.255.0
 ip rip authentication mode md5
 ip rip authentication key-chain RIP_MD5
 serial restart-delay 0
!

Verification:
Pic. 4 - RIP Update on R3.

Pic. 5 - RIP Details on R3.
Read More

Lab 78 - RIPv2 Source Update Validation

March 28, 2011
Prerequisites: CCNP level skills.

Topology
Pic. 1 - Topology Diagram.
Icons designed by: Andrzej Szoblik - http://www.newo.pl

Task 1
Change encapsulation on Serial0/1 interfaces between R1 and R3 to PPP. Configure R1, so that it receives the IP address: 10.1.13.1 from R3 using IPCP.


Task 2
Configure R1 so it installs RIP updates sent by R3.

Lab Solution

Task 1
Change encapsulation on Serial0/1 interfaces between R1 and R3 to PPP. Configure R1, so that it receives the IP address 10.1.13.1 from R3 using IPCP.


R1 Configuration:
!
interface Serial0/1
 ip address negotiated
 encapsulation ppp
 serial restart-delay 0
!

R3 Configuration:
!
interface Serial0/1
 ip address 10.1.13.3 255.255.255.0
 encapsulation ppp
 peer default ip address 10.1.13.1
 serial restart-delay 0
!

Note!
For this IP address to be assigned, the LCP negotiation must take place (shut, no shut on s0/1 interface).

Verification:
Pic. 2 - R1's Address Assigned via IPCP.

Pic. 3 - R3's Connected Networks.

Pic. 4 - R1's Connected Networks.

Notice!
R1 installs two host routes (/32) in its routing table. R3 installs a host route but has the /24 subnet entry as well. The result is that R1 and R3 are not on the common subnet.

Pic. 5 - RIP Table on R1.


Pic. 6 - RIP Updates on R1.


Task 2
Configure R1 so it installs RIP updates sent by R3.
R1 Configuration:
!
router rip
 version 2
 no validate-update-source
 passive-interface Loopback0
 network 10.0.0.0
 network 172.16.0.0
 no auto-summary
!

Verification:
Pic. 7 - R1's Routing Table.
Read More

Lab 77 - RIPv2 Triggered Updates

March 28, 2011
Prerequisites: CCNP level skills.

Topology
Pic. 1 - Topology Diagram.
Icons designed by: Andrzej Szoblik - http://www.newo.pl

Task 1
Configure R1, R3 to exchange RIP updates only when there is a topology change (on demand circuit).

Lab Solution

Task 1
Configure R1, R3 to exchange RIP updates only when there is a topology change (on demand circuit).

R1 Configuration:
!
interface Serial0/1
 ip address 10.1.13.1 255.255.255.0
 ip rip triggered
 serial restart-delay 0
!

R3 Configuration:
!
interface Serial0/1
 ip address 10.1.13.3 255.255.255.0
 ip rip triggered
 serial restart-delay 0
!

Verification:
Pic. 2 - RIP Updates on R3.

Notice!
R3 is NOT sending updates out Serial0/1 anymore.

Pic. 3 - RIP Details on R3.

Notice!
S0/1 interface is enabled for triggered updates now. Also R1's Serial0/1 interface has the same setting. The result is that the last update exceeds the maximum 30 seconds but the entry is still valid.

Pic. 4 - R3's Routing Table.

Notice!
The current time of the last update from R1 is 09:19 minutes. Still, the entries are valid.
Read More

Lab 76 - RIPv2 Unicast Updates

March 28, 2011
Prerequisites: CCNP level skills.

Topology
Pic. 1 - Topology Diagram.
Icons designed by: Andrzej Szoblik - http://www.newo.pl

Task 1
Configure R1, R2 and R4 so they send RIP advertisement using unicast instead of multicast on the LAN.

Lab Solution

Task 1
Configure R1, R2 and R4 so they send RIP advertisement using unicast instead of multicast on the LAN.

R1 Configuration:
!
router rip
 version 2
 passive-interface FastEthernet1/0
 passive-interface Loopback0
 network 10.0.0.0
 network 172.16.0.0
 neighbor 10.1.124.4
 neighbor 10.1.124.2
 no auto-summary
!

R2 Configuration:
!
router rip
 version 2
 passive-interface FastEthernet1/0
 passive-interface Loopback0
 network 10.0.0.0
 network 172.16.0.0
 neighbor 10.1.124.4
 neighbor 10.1.124.1
 no auto-summary
!

R4 Configuration:
!
router rip
 version 2
 passive-interface FastEthernet1/0
 passive-interface Loopback0
 passive-interface Loopback1
 network 10.0.0.0
 network 172.16.0.0
 neighbor 10.1.124.2
 neighbor 10.1.124.1
 no auto-summary
!

Note!
The 'neighbor' command turns on unicast for RIP updates. However, a router still uses multicast (224.0.0.9) as well. To turn off multicast RIP updates completely, the 'passive-interface' command is required.
Read More

Lab 75 - RIPv2 Broadcast Updates

March 28, 2011
Prerequisites: CCNP level skills.

Topology
Pic. 1 - Topology Diagram.
Icons designed by: Andrzej Szoblik - http://www.newo.pl

Task 1
Configure R1, R2 and R4 so they send RIP advertisement using broadcast instead of multicast on the LAN.

Lab Solution

Task 1
Configure R1, R2 and R4 so they send RIP advertisement using broadcast instead of multicast on the LAN.

R1, R2 and R4 Configuration:
!
interface FastEthernet1/0
 ip rip v2-broadcast
!

Verification:
Pic. 2 - Debug RIP on R4.

Pic. 3 - Debug IP Packet.
Read More

Lab 74 - RIPv2 Manual Summarization

March 27, 2011
Prerequisites: CCNP level skills.

Topology
Pic. 1 - Topology Diagram.
Icons designed by: Andrzej Szoblik - http://www.newo.pl

Task 1
On R5 summarize class C subnets (192.168.1.0/28 and 192.168.16.0/28). Do not use automatic summarization. Do not overlap any other addresses.

Lab Solution

Task 1
On R5 summarize class C subnets (192.168.1.0/28 and 192.168.16.0/28). Do not use automatic summarization. Do not overlap any other addresses.

R5 Configuration:
!
interface FastEthernet1/0
 ip address 10.1.35.5 255.255.255.0
 ip summary-address rip 192.168.1.0 255.255.255.224
!

Verification:
Pic. 2 - RIP Details on R5.

Pic. 3 - R3's Routing Table.
Read More

Lab 73 - RIPv2 Auto-Summary

March 27, 2011
Prerequisites: CCNP level skills.

Topology
Pic. 1 - Topology Diagram.
Icons designed by: Andrzej Szoblik - http://www.newo.pl

Task 1
On R5 create loopback interfaces with the following addresses:
  • 192.168.1.0/28
  • 192.168.1.16/28
Task 2
On R5 summarize class C subnets. Do not use any command on the interface to accomplish that.

Lab Solution

Task 1
On R5 create loopback interfaces with the following addresses:
  • 192.168.1.0/28
  • 192.168.1.16/28
R5 Configuration:
!
interface Loopback0
 ip address 192.168.1.1 255.255.255.240
!
interface Loopback1
 ip address 192.168.1.17 255.255.255.240
!

Task 2
On R5 summarize class C subnets. Do not use any command on the interface to accomplish that.


R5 Configuration:
!
router rip
 version 2
 passive-interface Loopback0
 network 10.0.0.0
 network 192.168.1.0
!

Notice!
Automatic summarization to the class boundary is turned on by default.

Pic. 2 - RIP Details.

Pic. 3 - R5's Routing Table.
Read More

Lab 72 - RIPv2 Metric Manipulation with Offset-List

March 26, 2011
Prerequisites: CCNP level skills.

Topology
Pic. 1 - Topology Diagram.
Icons designed by: Andrzej Szoblik - http://www.newo.pl

Task 1
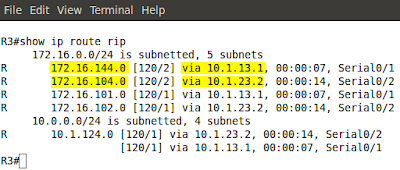
Configure R3 to reject 172.16.144.0/24 from R1 and 172.16.104.0/24 from R2. Do not use distribute-list or AD poisoning.

Pic. 2 - R3's Routing Current Table.

Lab Solution

Task 1
Configure R3 to reject 172.16.144.0/24 from R1 and 172.16.104.0/24 from R2. Do not use distribute-list or AD poisoning.

R3 Configuration:
!
access-list 1 permit 172.16.144.0
access-list 2 permit 172.16.104.0
!
router rip
 version 2
 passive-interface Loopback0
 offset-list 1 in 14 Serial0/1
 offset-list 2 in 14 Serial0/2
 network 10.0.0.0
 network 172.16.0.0
 no auto-summary
!

Verification:
Pic. 3 - RIP Debug on R3.
Read More

Lab 71 - RIPv2 Filtering with AD

March 26, 2011
Prerequisites: CCNP level skills.

Topology
Pic. 1 - Topology Diagram.
Icons designed by: Andrzej Szoblik - http://www.newo.pl

Task 1
Configure R3 so that it uses R1 as the gateway towards 172.16.144.0/24 and R2 as the next-hop router towards 172.16.104.0/24. Do not use the 'distribute-list' command and do not manipulate the metric.

Pic. 2 - R3's Current Routing Table.
  
Lab Solution

Task 1
Configure R3 so that it uses R1 as the gateway towards 172.16.144.0/24 and R2 as the next-hop router towards 172.16.104.0/24. Do not use the 'distribute-list' command and do not manipulate the metric.

R3 Configuration:
!
access-list 1 permit 172.16.144.0
access-list 2 permit 172.16.104.0
!
router rip
 version 2
 passive-interface Loopback0
 network 10.0.0.0
 network 172.16.0.0
 distance 255 10.1.23.2 0.0.0.0 1
 distance 255 10.1.13.1 0.0.0.0 2
 no auto-summary
!

Verification:
Pic. 3 - R3's Routing Table.
Read More

Lab 70 - RIPv2 Filtering with Passive-Interface

March 26, 2011
Prerequisites: CCNP level skills.

Topology
Pic. 1 - Topology Diagram.
Icons designed by: Andrzej Szoblik - http://www.newo.pl

Task 1
Configure RIP filtering so that R1 and R2 do not learn 172.16.104.0/24 and 172.16.144.0/24. Do not use any access-list, distribute-list and do not change AD values. R4 should learn all RIP subnets.

Lab Solution

Task 1
Configure RIP filtering so that R1 and R2 do not learn 172.16.104.0/24 and 172.16.144.0/24. Do not use any access-list, distribute-list and do not change AD values. R4 should learn all RIP subnets.

R4 Configuration:
!
router rip
 version 2
 passive-interface FastEthernet1/0
 passive-interface Loopback0
 passive-interface Loopback1
 network 10.0.0.0
 network 172.16.0.0
 no auto-summary
!

Verification:
Pic. 2 - R4's Routing Table.

Notice!
RIP's Passive-Interface prevents a router from sending update out this interface. The router still installs RIP updates advertised by R1 and R2.

Pic. 3 - R1's Routing Table.

Notice!
R1 no longer receives the subnets in question: 172.16.104.0/24 and 172.16.144.0/24.
Read More

Lab 69 - RIPv2 Filtering with Extended ACL

March 26, 2011
Prerequisites: CCNP level skills.

Topology
Pic. 1 - Topology Diagram.
Icons designed by: Andrzej Szoblik - http://www.newo.pl

Task 1
Using extended ACL configure RIP filtering so that R3 prefers R1 towards 172.16.104.0/24 and R2 should be the gateway towards 172.16.144.0/24.

Pic. 2 - R3's Current Routing Table.


Lab Solution

Task 1
Using extended ACL configure RIP filtering so that R3 prefers R1 towards 172.16.104.0/24 and R2 should be the gateway towards 172.16.144.0/24.

R3 Configuration:
!
access-list 101 deny   ip host 10.1.13.1 172.16.144.0 0.0.0.255
access-list 101 permit ip any any
access-list 102 deny   ip host 10.1.23.2 172.16.104.0 0.0.0.255
access-list 102 permit ip any any
!
router rip
 version 2
 passive-interface Loopback0
 network 10.0.0.0
 network 172.16.0.0
 distribute-list 101 in Serial0/1
 distribute-list 102 in Serial0/2
 no auto-summary
!

Notice!
Source IP address in an extended ACL matches on the IP address of the advertising router if used with the 'distribute-list'.

Notice!
The 'distribute-list' will not take named ACLs as the arguement (as of the time of writing this post).

Notice!
For the changes to take effect quicker use 'clear ip route *'.

Verification:
Pic. 3 - R3's Routing Table.
Read More

Lab 68 - RIPv2 Filtering with Standard ACL

March 26, 2011
Prerequisites: CCNP level skills.

Topology
Pic. 1 - Topology Diagram.
Icons designed by: Andrzej Szoblik - http://www.newo.pl

Task1
Using a standard ACL filter out all odd subnets in the range 172.16.x.x/24 on R5.

Task 2
Remove filtering created in Task 1.
Using a standard ACL filter out all even subnets in the range 172.16.x.x/24 on R5.

Task 3
Remove filtering created in Task 2.
Using a standard ACL filter out 172.16.144.0/24 on R5.

Pic. 2 - Initial Routing Table on R5.

Lab Solution

Task1
Using a standard ACL filter out all odd subnets in the range 172.16.x.x/24 on R5.

R5 Configuration:
!
ip access-list standard ALLOW_EVEN
 permit 172.16.0.0 0.0.254.255
 permit 10.0.0.0 0.255.255.255
!
router rip
 version 2
 network 10.0.0.0
 distribute-list ALLOW_EVEN in FastEthernet1/0
 no auto-summary
!


Verification:
Pic. 3 - R5's Routing Table.
Task 2
Remove filtering created in Task 1. 
Using a standard ACL filter out all even subnets in the range 172.16.x.x/24 on R5.

R5 Configuration:
!
ip access-list standard ALLOW_ODD
 permit 172.16.1.0 0.0.254.255
 permit 10.0.0.0 0.255.255.255
!
router rip
 version 2
 network 10.0.0.0
 distribute-list ALLOW_ODD in FastEthernet1/0
 no auto-summary
!

Verification:
Pic. 4 - R5's Routing Table.
Task 3
Remove filtering created in Task 2.
Using a standard ACL filter out 172.16.144.0/24 on R5.

R5 Configuration:
!
ip access-list standard RIP_FILTER
 deny   172.16.144.0 0.0.0.255
 permit any
!
router rip
 version 2
 network 10.0.0.0
 distribute-list RIP_FILTER in FastEthernet1/0
 no auto-summary
!

Verification:
Pic. 5 - R5's Routing Table.
Notice!
172.16.144.0/24 is not installed. All other routes are.
Read More

Lab 67 - RIPv2 Send and Receive Versions

March 26, 2011
Prerequisites: CCNP level skills.

Topology
Pic. 1 - Topology Diagram.
Icons designed by: Andrzej Szoblik - http://www.newo.pl

Task1
R5 joined the RIP domain but is running RIPv1. It advertises 192.168.5.0 network. Configure routers so R5 receives all the prefixes from the other routers. All other routers should receive 192.168.5.0.

R5 Current Configuration:
!
router rip
 network 10.0.0.0
 network 192.168.5.0
!

Pic. 2 - R5's RIP Details.
Notice!
R5 is running RIPv1 and can receive updates from both RIPv1 and RIPv2 (any version). That's why it installs all the routes sent by R3 (below).

Pic. 3 - R5's Routing Table.
R3 Rejects advertisement from R3 (192.168.5.0) since it is not RIPv2 update.

Pic. 4 - Debug on R3.

Pic. 5 - R3's Entry for 192.168.5.0

Lab Solution

Task1
R5 joined the RIP domain but is running RIPv1. It advertises 192.168.5.0 network. Configure routers so R5 receives all the prefixes from the other routers. All other routers should receive 192.168.5.0.

R3 Configuration:
!
interface FastEthernet1/0
 ip address 10.1.35.3 255.255.255.0
 ip rip receive version 1
!


Notice!
RIPv2 can send or receive RIPv1 updates using the interface commands:
(config-if)#ip rip send version 1
(config-if)#ip rip receive version 1

Verification:
Pic. 6 - Debug on R3.
Read More

Post Top Ad